Tuesday, January 19, 2016

Revell Black Diamond - 1:350 snap tite kit {part 8}

Well,  I gave it some thought.........I could go further with 'er,  but in the interest of time,  I figured I'd leave 'er as she is.   She looks pretty busy........busy enough for two young boys,  whose biggest question will be,  "where are the sails?"   I know that will be the first question.......it's going to be hard for them to understand the concept of furled sails.   I think they'll be happy to see 'er though.......and when I whip out the kits for them.............well,  I just hope that there might be two more modelers joining the fold.....better than play'in those damn video games and junk.   I see nothing wrong with video games,  but I think there is a time and a place for them.  I also think there is a time and place for creativity and imagination..........and what better time is there to spend?  So,  here is the finished model.   The bottom of the hull is cemented to the stand.........and then the upper part of the ship was cemented in it's place there after.  The paint work isn't the best,  but it'll do for this beast.


OMG!!!!!   I almost forgot............the FLAGS!!!!!   They are in the back of the instruction sheets,  ready to be cut out.   The sails they want you to use are there as well.   They have different styles to choose from.......I just cut out the normal ones.......one flag and three pendents.   They were cemented in place with white glue.


Ahhhhhh, who knows........I may add more lines to her in the future.   I can add in the fore braces and maybe some tack lines.   For now though.....she is good,  waiting for my two grand sons to come over to see it.   Little do they know about these two gems I have waiting for them as well.


If I do more,   I'll add it here............stay tuned  ;)

AHOY!!!

Revell Black Diamond - 1:350 snap tite kit {part 7}

The holes for these assemblies have already been drilled.   Starting on the starboard side,  the long threads were tied.   These were not cemented in place just yet.


The short threads were tied in place along the bulwark.   They were weighted so they would stand up on the bulwark,  and cemented in place.   The top line will be cut off,  leaving the knot they are bound with,  so that the long thread {after being rigged} can be tied in it's place.


Here is what the whole assembly will look like.......


After they were all run,  strung,  tied,  and cemented...here is what they look like.


I did the aft braces next........fore braces,  main braces,  and mizzen braces.   I know that there are fore braces as well.......not sure if I will add them.   It's gonna depend on how all this looks.


I may add some more lines....one more update should do it for this build.

AHOY!!!

Revell Black Diamond - 1:350 snap tite kit {part 6}

The lanteen yard also needs to be rigged.   At the fore end of the yard,  there are a pair of lines that would be terminated to a belaying pin.......but in this case,  I simply tied them off at the lowest rung on the aft side of the main mast ratlines.


The lines that are to be tied to the aft end of the lanteen yard,  are called vangs {I'm not sure what the fore lines are called}.   In most cases,  they consist of a pulley style assembly.   I was going to try and do it here,  but I decided to keep it simple.   They are tied off to holes that were drilled through the bulwarks.


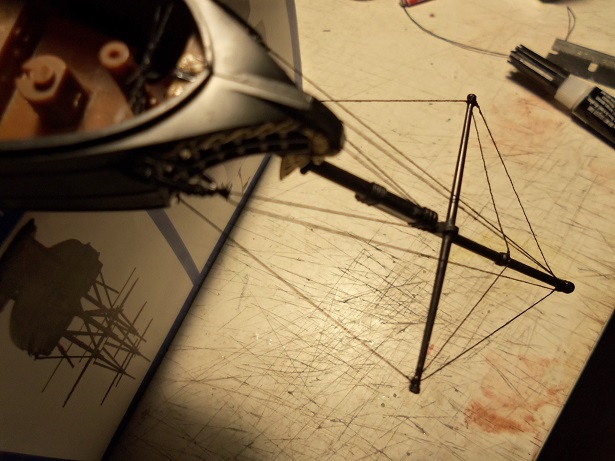
Now......to make the dead eye assemblies I'm going to need for the back stays.   There are to be twelve of them......6 'long threads',  and 6 'short threads'.   The long threads are to be the ones that will be rigged up and over,  through the mast.   The short threads will be the ones that they will terminate to.  One set on one side,  the other set on the other side.   I hope this works.   The pole I used for the bow dead eye assemblies was set up in the vise again,  and the tying commenced.   It wasn't easy.
     Apparently........there is an incorrect way of doing it........after looping the thread around the pole {I wrapped it eight times},  they are tied together.   But,  if one of these threads is not tied to the binding thread,  when pulled {as it need to,  to create the shape},  the tie will continue to close,  ruining the assembly....it's no good.   To refresh your memory.......here is the set up:


The binding thread is run through a slot cut into the end of the pole,  and its secured at the other end of the vise {I just caught them between the pole and the vise}.   The dead eye thread is wrapped around the pole,  trapping the binding threads inside the loop.   They are then tied to prevent unraveling.  


The binding threads are then cut where the slot is,  and both are tied opposite of one another.   The binding thread must also be tied to the wrapped thread.......once pulled off of the pole,  it is stretched and set up in the helping hands,  where the knots are cemented and trimmed.   Keeping in mind how long the rigging threads are on these assemblies,  will determine which one will be doing what job.


     I've made all the long threads........now all I have to do,  is make the short threads.   I lost a few in the process......there will be two pairs for each mast.


There are some minor flaws,  but that's OK........they may disappear once on the model.   It's taken me pretty much all day to make them........pulled away from time to time........also dealing with the death of a friend of mine.  It was a good distraction.   By nightfall,  they were all done.


Now to see how they look...........

AHOY!!!

Revell Black Diamond - 1:350 snap tite kit {part 5}

Once I could get back to the model,  the Main mast was made ready for installation.   It was cemented in place,  and then the lower ratlines.   I was going to rig the main mast before cementing in the mizzen mast,  but......in the grand scheme of things,  it really doesn't matter.   The mizzen mast and ratlines were installed next.


The lifts were done on the fore mast yards........the lower yard lifts usually are rigged as a pulley assembly,  so I tried to double the thread up to create a sort of looping shape out toward the tip of the yard,  and back again.   As with the fore mast,  the lower stays are doubled to give them a thicker look.   I did sort of goof here.......the lanteen yard {on the mizzen mast} was supposed to have been cemented in place before the ratlines were installed.   It wasn't that hard to get it in there though,  so I could breathe a sigh of relief.....I didn't really mess it up.   The mizzen mast needs the upper stays still.


The lifts were rigged to the other yards in the dame fashion........the lower yards all got the same treatment,  as the fore lower yard.   The upper mizzen stay was also added.   Here you can see a better picture of what I did the the lower yards.


Next will be the back stays.  I will need to drill all the holes needed to rig them.

AHOY!!!

Friday, January 8, 2016

Revell Black Diamond - 1:350 snap tite kit {part 4}

The bow is rigged well enough.....time to move on towards the stern.   more holes were drilled in other logical places......like the pair that I drilled through the bow railings.  This is how I'm going to have to make the tie points.....just drill some holes.   I will need to drill other holes in the bulwarks as the masts are cemented in place.   I did two pairs of dead eye assemblies for the bow......I will need to make two more pairs for the fore mast,  two for the main mast,  and two for the mizzen mast.  These will be for the back stays.   Time to paint the sails and yards,  which will be cemented in place,  as the mast are installed.   I am out of flat grays......I will use flat tans and white instead.   I got ahead of myself here....failing to take pictures of the process.   Here are the fore yards / sails with the flat tan and white.


Here is a view of how it looks as it progresses.......the flat tan and then the white.


Since I'm using black thread,  I'm detailing the furling ropes black as well.  I don't plan on using different color threads to do the rigging.  I'm not getting fussy.


The fore mast was cemented in first.


The yards were cemented in place next.


Then the fore stays were rigged.......the lower stay being thicker by doubling up on the thread.


For the main mast,  they are called main stays........for the mizzen,  they are called mizzen stays.  The lifts will be added to the yards.   I was going to do the back stays before adding the next mast,  but I may not.......it may make it harder to add in other lines.   However it plays out,  I'm thinking that it will enhance the model.

AHOY!!!

Revell Black Diamond - 1:350 snap tite kit {part 3}

My first attempt at my idea was a bust.   The idea to make dead eye assemblies from thread seemed like such a good one.   I clamped a metal pole {yea......that's my x-actor} in the vise and wrapped thread around it,  dabbing some white glue on them when they were set up.   What I got was these flattish looking coils that were hard to conform to the oval appearance they needed to have.


     Setting one up on the model,  after drilling two pairs of holes down on the wales near the bow spirit,  they looked terrible.   I had taken a couple pictures.........they didn't come out too clear,  so I tossed them out.   Just as well I did.    Thinking about this a bit further......I amended the original idea by cutting a slot across the end of a small diameter plastic dowel.  I fitted a piece of wood dowel inside the plastic tube and clamped it in the vise.   These will be more to scale....not exact,  but small than the first attempt was.  A piece of thread was set in the slot in the end and pulled past the vise so it wouldn't have any slack.


More thread was wound around the pole,  trapping the thread that was strung onto it.   Once it was set up,  the trapped thread was cut and tied around opposite ends of the thread coil.


This tied the bundle of thread together and could now be set up in my helping hands.   It was pulled to create the oval appearance,  and the knots were cemented {just the knots}.   I had done some of the bow spirit rigging while this was going on.  It's hard to show how these dead eye assemblies look,  as I'm dealing with black,  but I hope you can see.   There will be two sets of these assemblies at the bow.


I also added in a pair of bob stays.......these originate from the bow stem, terminating at two points on the bow spirit.   I failed to get pictures of  the progress till now.....as you can see,  they are hard to see.   I will try and get better pictures of this.


This is what the dead eye assembly looks like in the helping hands.   Future ones has any tell tale knotting left off on either end {not that it will matter}.


These are a couple good pictures of the Bob stays and how the dead eye assemblies look.   An over head view really shows how they look and the job that they do.   So far,  I think the rigging is working out quite well.


AHOY!!!

Revell Black Diamond - 1:350 snap tite kit {part 2}

Here I was thinking how few parts there were in the kit.......how long would it take me to build it.        
    The answer......I should have known better.   Before I knew it,  it was the weekend and time for me to go back to work.......my vacation was over.   I had gotten as far as painting the upper ratlines {they are part of the masts},  and the woolings around the lower section of the masts.  When I got back to it,  I finished them and then did the side windows of the stern.


The side windows need touch up.......even with narrow tipped detail brushes,  I still made silly mistakes.


The stand was touched up a little more......not perfect,  but it looks better than it was.


Plastic ratlines.......and yards with sails furled up.   I can do nothing with the ratlines......in keeping with the kit,  I will use them.   The kit does supply sails.......they are nothing more than paper cut outs in the back of the instruction sheets.  Noting that the yards have this detail,  I'm not going to use the paper sails......I'll accent the yards and the ropes that furl the sails,  and leave it as that.   With the rigging,  it will look just as good.   Note that the chain plates do not have a lot of room to them......as I mentioned earlier,  there are no places for rope ties.   I will have to drill holes and tie the ropes off as best I can.


AHOY!!!